
While testing I would recommend that you start by having console access to your device so that you see what’s going on. As mentioned previously my first device will be a Catalyst 2960 switch, but you can use anything when following along. As long as you make slight changes to the configurations to suite your environment it will work just fine.
You will need a Cisco IOS device without any configuration, if it’s an old device you will have to issue a write erase before getting started.
Power on your device and let it boot. If you’re into meditation you can probably take a break and do that for a while, sometimes it seems that it takes forever for these devices to start.
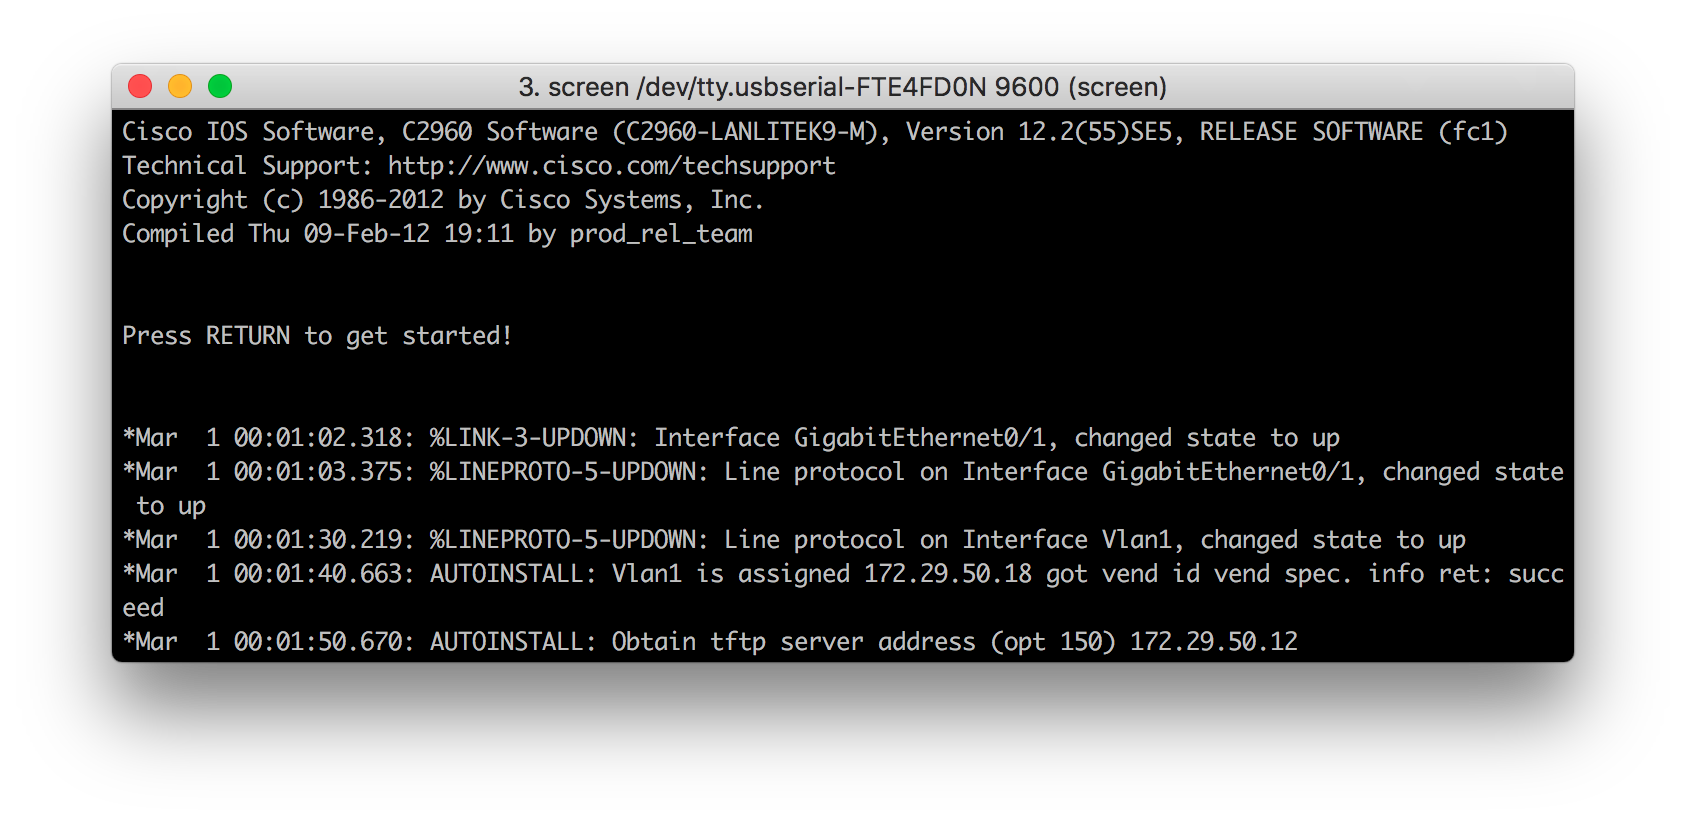
If you are looking at the console you should eventually see that the device gets an ip address from the DHCP server along with the ip address to the TFTP server. Since we haven’t prepared the required files we can just look at the output in the TFTP server to see what’s happening.
(venv) root@srv-deploy-1:/opt/ztp# python ztp_tftp.py
WARNING:root:No callback specified for server statistics logging, will continue without
ERROR:root:Caught exception: [Errno 2] No such file or directory: '/opt/ztp/tftproot/network-confg'.
Traceback (most recent call last):
  File "/opt/ztp/venv/lib/python3.5/site-packages/fbtftp/base_handler.py", line 145, in __init__
    self._response_data = self.get_response_data()
  File "ztp_tftp.py", line 34, in get_response_data
    return TftpData(self._path)
  File "ztp_tftp.py", line 18, in __init__
    self._size = os.stat(path).st_size
FileNotFoundError: [Errno 2] No such file or directory: '/opt/ztp/tftproot/network-confg'

############################################################
Peer: 172.29.50.18 UDP/53673
File: network-confg
Sent Packets: 0
############################################################
At first glance it looks like something went wrong. In reality what happened was that the network device tried to download a file which we hadn’t created on the TFTP server, and we don’t have any code to catch the error. Let’s just ignore that for now. The important part is that we can see that the device requests a file called network-confg. If we just leave it running we eventually see that the device tries to download four files.
The devices doesn’t actually need four files, what happens is that it starts by trying to download the network-confg file. If that file doesn’t exist the device will after a timeout instead request cisconet.cfg. The reason for this is that once upon a time Microsoft had an operating system called MS-DOS which only supported filenames with a maximum length of 8 characters including a 3 characters extention as in ThisIsIt.exe. If you thought PEP-8 is rough you didn’t experience the 90’s. Safe to say we can ignore the files ending in “.cfg” and use the other ones instead.
That leaves us with two files, so what do each of them do?
The idea behind the network-confg file is that it can describe hosts on the network. The way to do this is with the Cisco IOS command:
ip host [name] [ip]
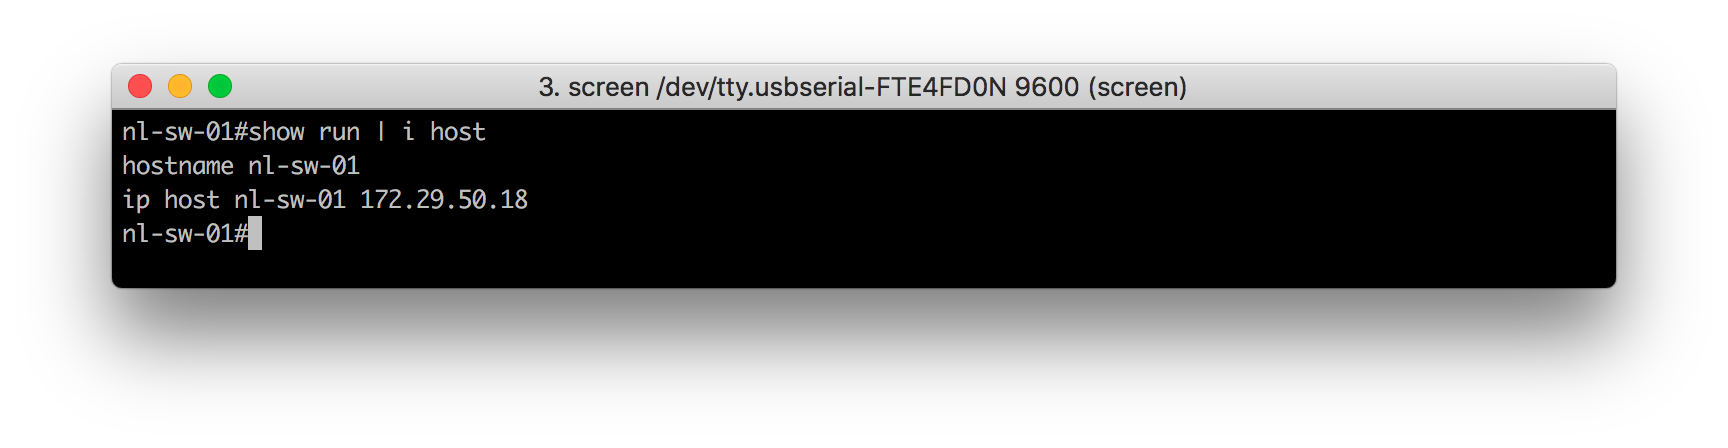
Looking at the output above we can see that the switch was assigned the ip address 172.29.50.18 when it booted up. If I were to know that my device would always get this address I can create an entry for it in the network-confg file. To illustrate this lets create the file on the TFTP server.
/opt/ztp/tftproot/network-confg:
ip host nl-sw-01 172.29.50.18

end
Lets reload the switch and keep an eye on the output from the TFTP server.
############################################################
Peer: 172.29.50.18 UDP/49710
File: network-confg
Sent Packets: 1
############################################################
First we see that the device requests and finds the network-confg file we created, since it find this file it never looks for the cisconet.cfg one.
Interestingly after the switch has downloaded the network-confg file, and examined the contents, it never requests the router-confg.
############################################################
Peer: 172.29.50.18 UDP/50276
File: nl-sw-01-confg
Sent Packets: 0
############################################################
Instead the device requests a file called nl-sw-01-confg, this is because its ip address 172.29.50.18 matches the host nl-sw-01 as defined in network-confg. Since the file doesn’t exist it of course fails. We can however see that the device in fact has some configuration on it. The hostname has been changed from the default of “switch” to nl-sw-01.
A config line for the ip host has also been added. This perhaps doesn’t look that elegant, especially if you were to have several hundred lines of them. One thing to keep in mind though is that the configuration applied to the device during provisioning doesn’t need to stay there. For example you could use the config_replace method of Napalm to later remove all of these undesired lines.
Also the concept of using “ip host” configuration lines is just one option, the device also queries any DNS servers configured in the DHCP scope and does a reverse lookup on the assigned ip address. With these DNS entries the “ip host” isn’t added to the running configuration. If I create a dns entry for the device:
~  ᐅ host 172.29.50.18
18.50.29.172.in-addr.arpa domain name pointer nl-dns-sw-01.int.networklore.com.
~  ᐅ
We can see that it will try to download a known configuration from the tftp server.
############################################################
Peer: 172.29.50.18 UDP/54046
File: nl-dns-sw-01-confg
Sent Packets: 0
############################################################
The use of ip hosts or DNS generally means that you have manual assignments in the DHCP server where you know the mac address of the device you are setting up. There are other options though, you can assign DHCP based on location as we will explore later in this tutorial. I won’t talk more about DNS in this tutorial, I only mention it here go let you know that it can be used. You will have to figure out what makes most sense in your environment. However, if you decide to use DNS I strongly recommend that you configure it using a configuration management framework based on information in your inventory.
So what happened to the router-confg file? The device being provisioned will only read this file after it has downloaded network-confg and hasn’t found a matching entry for its ip address to a “ip host” command, or a reverse DNS entry.
While the device will look for this file if it hasn’t found a more specific one, the file isn’t required. If you want you could store all of the configuration in network-confg, that’s perfectly fine. In fact it’s probably better since the device will load the configuration from network-confg before router-confg so the provisioning will be faster if you only use the first file.