
 The easiest way to describe Ansible is that it’s a simple but powerful it-automation tool. In the words of its creator Michael DeHaan “I wanted a tool that I could not use for 6 months, come back later, and still remember how it worked.” and it really feels like riding a bike. Even years from now when I take a look at an Ansible Playbook I’m sure I will immediately see what it does. Playbooks, which allows you to run several tasks together, are writting in YAML making them easy to read.
This guide is too short to teach you everything about Ansible. Instead the aim is to give you an idea of how you can use Ansible, and how it can help you manage your IT environment. Even if you don’t end up using Ansible, learning tools like it as Chef or Puppet can help you to think differently about how you operate your network.
Even though Ansible is mostly a tool for servers, there are some support for network devices such as Citrix Netscaler. Still if you work mostly in networking (like I do) you might ask yourself why you would want to learn Ansible. Currently one of the best benefits is that it teaches you a sound way to think about your environment and the knowledge of how it works will be useful as other tools for network automation emerges. Basically Ansible is just one of those things which is good to learn.
The Ansible master or controller if you will runs on Linux and Mac OS X. In addition to those systems it can be used to manage Windows, BSD, a number of cloud services and a growing number of network devices. So if you are a Windows user you will need a virtual machine running Linux in order to try Ansible.
Also it requires Python 2.6 or higher, Python 3.x isn’t currently supported.
If you’re using a common Linux distribution you will have a package for Ansible. Granted it might be a bit outdated since Ansible is updated fairly often, also it might not be included in your distributions default repositories.
!Ubuntu
sudo apt-get install software-properties-common
sudo apt-add-repository ppa:ansible/ansible
sudo apt-get update
sudo apt-get install ansible

!CentOS
sudo yum install ansible
Another way to install Ansible is to use Pythons package manager pip.
sudo pip install ansible
Still another way is to not install Ansible and only run it. The way to do this is to clone the git repo and just set the environment variables.
git clone git://github.com/ansible/ansible.git --recursive
cd ./ansible
source ./hacking/env-setup
Using the last example you would have to source the env-setup file each time to login the the shell again. Running Ansible directly from source this way requires that the following Python modules are installed; paramiko, PyYAML, Jinja2 and httplib2. After downloading the git repo you can also package the files there as an rpm or deb file.
Unlike Puppet, Ansible doesn’t have a client server module where a server is a puppet master and a client has the puppet agent role. Ansible is more of a standalone solution where a computer manages other devices without those other devices having to be “Ansible aware”. So when you upgrade to a newer version of Ansible you just do it in one place or on one machine. You don’t have to patch all of your devices. As it doesn’t rely on an agent Ansible instead uses ssh when communicating with other nodes.
By default the file /etc/ansible/host is your inventory. Both the ansible and ansible-playbook commands take the -i argument to specify another inventory file. This can be useful if you want to use separate inventory files for different purposes, or if you don’t have write access to the file under /etc. If you’ve installed from pip or just cloned the repo you can just create your own inventory file, or probably use several different ones.
The inventory file is a simple text file in ini format. If you just open the file and enter server names on each line those servers will be in the “all” group
dbserver1
dbserver2
webserver1
webserver2
webserver3
You can also segment your inventory file with groups such as.
dbserver1
dbserver2
webserver1
webserver2
webserver3

[dbservers]
dbserver1
dbserver2

[webservers]
webserver1
webserver2
webserver3
Here the “all” object will contain five servers and the dbservers group will only contain your database servers. In the playbooks (more about them below) you can then perform different tasks on different kinds of servers. Aside from using groups you can nest groups or assign specific settings and variables to groups. For example these are a few of the settings you can use; ansible_ssh_port, ansible_ssh_user, ansible_ssh_private_key_file.
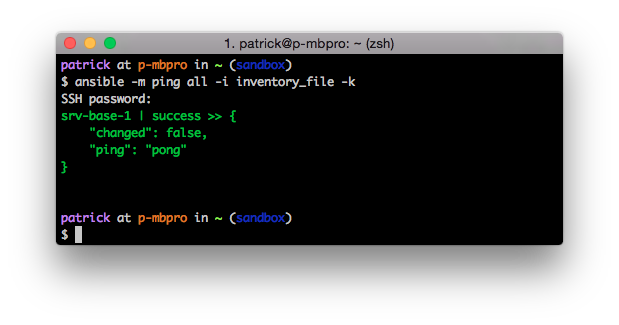
Once you created your inventory file you can test Ansible. The ping module is used just to do a simple connection test:
ansible -m ping all
Did it work? If so, why did it work? Perhaps you got an error like this:
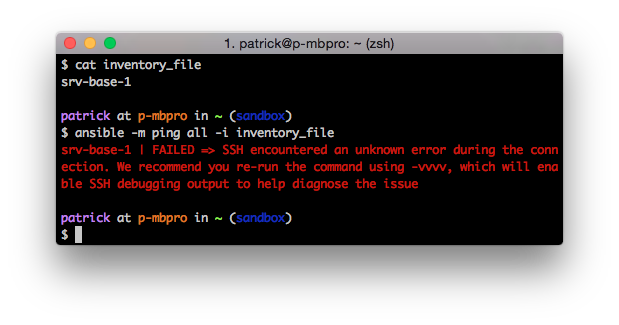 Authentication failure without even prompting for a password? Well by default Ansible tries to connect with ssh keys. So if you haven’t set that up Ansible will fail. You can implement ssh keys or you can use the “-k” option which uses username and password instead.
To see all options just type:
ansible -h
Since there’s no Ansible agent on the remote machine and we are connecting with ssh our access on the remote machine will depend on the privileges of the user we are connecting with. Some modules like ping which we used above doesn’t require any special privileges on the remote machine. However if we want to install software or change restricted files we can’t do that as a regular user. To elevate our privilege we can tell Ansible to use sudo (-s) or perhaps login as root.
There are a lot of official Ansible modules. Also if you know how to program in Python it’s easy to develop your own modules. In fact starting from scratch without any prior knowledge of how the modules worked, I was able to create an Ansible module for SNMP in a few hours. You can write modules in other languages too, but Python is probably easiest. There are modules to install software, create users, ensure services are stopped or started. Dynamically change your configuration files, automate specific tasks and a lot more. For example you could create a playbook to download, compile and install Nagios, then configure Nagios and automatically setup your network monitoring solution.
Once you’ve gotten Ansible up and running you should read about the different modules in order too see how you can use them. However one of the first modules that you might want to take a closer look at is the setup module. I don’t know if I really like the name of the module, perhaps “facts” would have been a better name. What the setup module does is to return Ansible facts which describe the target machine. You can use these facts as variables in your playbooks and templates.
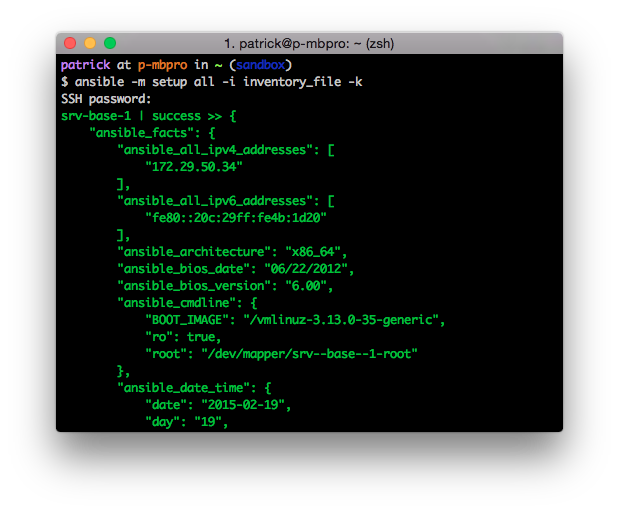
As you can see the setup module returns a lot of information, in fact it scrolls for several pages.
A Playbook is a set of instructions written in yaml. It tells Ansible which devices to connect to and what to do with them. A simple playbook might look like this.
apache2.yml:
---
- hosts: all
  tasks:
  - name: install apache2
    apt: pkg=apache state=present
  - name: install index.php
    template: src=index.php.j2 dest=/var/www/html/index.php
  - name: start service
    service: name=apache2 state=started
The above playbook would target all of the hosts in the inventory file we specify. On those hosts it would perform three tasks. First it would ensure that apache2 is installed (with apt), secondly it will use the template called index.php.j2 and create a new index.php file on the destination hosts. This template could include variables from the setup module or other dynamic information. Finally the playbook will ensure that the Apache service is running on the remote machines.
If you were to run the playbook again, nothing would be changed on the remote machines. A goal with playbooks is to make them idempotent so that a change is only done if it’s actually needed. So if someone were to modify the index.php file it would be replaced with the correct one from your template the next time you ran the playbook.
To run the playbook you use the ansible-playbook program.
ansible-playbook -i inventory_file apache2.yml
Now picture this. We have a company which has four branch offices. They want to use strongSwan to connect these offices by VPN. In order to have a fully meshed network we need to setup 6 (4*3/2) statically defined VPN tunnels. Though perhaps a bit tedious 6 connections is workable. If the company would instead have 20 branch offices that’s 190 tunnels (20*19/2). You don’t want to configure 190 VPN tunnels, or ten for that matter. We don’t have too, Mr Miagi had karate kid to paint his fence, we have Ansible to do our work. First however we should learn more about Playbooks.
In the basic Playbook example we stored all the logic in a single file. As you create bigger playbooks its easier to segment them a bit. You can use a directory structure as below:
/playbook.yml
/vars/variable_file1.yml
/vars/variable_file2.yml
/roles/db/tasks/main.yml
/roles/db/handlers/main.yml
/roles/db/files/base-config.cfg
/roles/common/tasks/main.yml
/roles/www/tasks/main.yml
/roles/www/handlers/main.yml
/roles/www/files/base-config.cfg
/roles/www/templates/sites.cfg.j2
In the above example playbook.yml is the actual Playbook which looks like this:
---
- hosts: webservers
  roles
  - common
  - www


- hosts: dbservers
  vars_files:
  - vars/variable_file1.yml
  - vars/variable_file2.yml
  roles
  - common
  - db
There are two sections here. One for the database servers and one for webservers. They both have a specific role and the common role. The roles directory contain a number of subfolders. By default Ansible will run the main.yml file located in the tasks directory under the specific role. The files folder is used for files, typically static config files, you want to copy to the remote machines. The templates folder is used for dynamic templates. It utilizes the templating engine Jinja2 to create files based on dynamic content, this could be information you collected through the Ansible setup module from the current or another machine. The information you use in the template could also come from your variable files. Handlers is the last folder, you can use a handler to trigger actions. For example if you have a task that changes a configuration file you can notify a handler and have it restart the service which uses the configuration file.
Returning to our VPN scenario. In this example we’ll use four Linux machines, a combination of Ubuntu 14.04 and CentOS 6.5. In the real world you would probably want to use the same distribution throughout your organization. Here it’s done just an example to show you what can be done with Ansible. We will have two CentOS installations located in New York (ny-vpn-1) and Amsterdam (ams-vpn-1), then the Ubuntu boxes in London (lon-vpn-1) and Singapore (sin-vpn-1).
On these devices the interface eth0 will be the Internet interface and eth1 will be the internal interface. We want Ansible to collect this information from all of the hosts and use it while configuring the VPN tunnels. A note in this is that starting with CentOS 7.0 the interfaces aren’t called ethX any longer and this demo was done with CentOS 6.5. You could do something similar for CentOS 7.0, however the purpose here isn’t to offer a vpn solution but to learn Ansible.
Starting with the actual playbook file it looks like this:
---
- hosts: vpn
  vars:
    is_centos: "'{{ ansible_distribution|lower }}' == 'centos'"
    is_ubuntu: "'{{ ansible_distribution|lower }}' == 'ubuntu'"
  vars_files:
  - "vars/{{ ansible_distribution|lower }}.yml"
  roles:
    - strongswan
You can download these example files from Github.
Going from the top down the first line starts the playbook with —, then the hosts parameter tells Ansible to only run the playbook against members of the vpn group (as defined in the Ansible inventory file). After this we define some variables under the vars: section. These will be boolean true/false variables. The first one is_centos will be true if the lowercase value of the {{ ansible_distribution }} is equal to “centos”. The |lower part is a Jinja filter. So the variable {{ ansible_distribution }} you would get from the setup module would be CentOS, but here we use a filter as indicated by the pipe character. We will use these variables later when we want to run certain tasks only if the current machine has a specific distribution such as Ubuntu. Next we read the actual variable files in the vars directory. The variable {{ ansible_distribution|lower }} will be translated and the actual file being loaded for each specific host will be centos.yml or ubuntu.yml.
Looking at the content of the actual files we define two variables. We will use both of the variables later on in the playbook. In this example the strongswan_service variable containes the name of the service running strongSwan. In the case of Ubuntu and CentOS the service name is “strongswan” on both of the systems, but if we would have had Debian the service name would have been “ipsec”.
$ cat centos.yml
strongswan_base: /etc/strongswan
strongswan_service: strongswan
$ cat ubuntu.yml
strongswan_base: /etc
strongswan_service: strongswan
At last we define a single role, strongswan. This indicates that we should look in the roles/strongswan directory, and from there in the tasks/main.yml file.
This will be located in the roles/strongwan and the first file we look at is the tasks/main.yml
---
# Tasks to install and configure strongSwan

- name: Downloading the EPEL repository definitions (CentOS 6)
  get_url: url=http://dl.fedoraproject.org/pub/epel/6/x86_64/epel-release-6-8.noarch.rpm dest={{ ansible_env.HOME }}/epel-release-6-8.noarch.rpm
  when: is_centos

- name: Downloading and enable the EPEL repository definitions (CentOS 6)
  yum: name={{ ansible_env.HOME }}/epel-release-6-8.noarch.rpm state=present
  when: is_centos

- name: Install strongSwan (CentOS)
  yum: pkg=strongswan state=present
  when: is_centos

- name: Install strongSwan (Ubuntu)
  apt: pkg=strongswan state=present
  when: is_ubuntu

- name: Configure ipsec.conf
  template: src=ipsec.conf.j2 dest={{ strongswan_base }}/ipsec.conf owner=root group=root mode=0644
  notify: restart strongswan

- name: Configure ipsec.secrets
  template: src=ipsec.secrets.j2 dest={{ strongswan_base }}/ipsec.secrets owner=root group=root mode=0600
  notify: restart strongswan
We start off with three tasks which will only run if the target machine is a CentOS installation. Since strongSwan exists in the EPEL repo we need to download and install that first. This is done using the get_url module. We can note that the download destination points to an Ansible variable {{ ansible_env.HOME }} this is the home directory of the user we login with to the remote machine. The EPEL repo and strongswan package is installed with the yum module. On the Ubuntu machines we use the apt module to install strongswan.
Then we use the template module which will load the files from the roles/strongswan/templates directory. The first template will be the file ipsec.conf.j2 which will be processed and transfered to the dest directory on the target machine. Here we use the {{ strongswan_base }} directory so the location will be different depending on if the target is using Ubuntu or CentOS.
ipsec.conf.j2
# {{ ansible_managed }}

#  basic configuration
config setup

conn %default
 ikelifetime=1440m
 keylife=60m
 rekeymargin=3m
 keyingtries=1
 keyexchange=ikev1
 authby=secret


# Connections will be added here
{% for host in groups['vpn'] %}
{% if not ansible_hostname == hostvars[host].ansible_hostname %}
conn {{ hostvars[host].ansible_hostname }}
 type=tunnel
 ike=aes128-sha1-modp2048,3des-sha1-modp1536,3des-sha1-modp1024
 esp=aes128-sha1,3des-sha1
 left={{ ansible_eth0.ipv4.address }}
 leftfirewall=yes
 leftsubnet={{ ansible_eth1.ipv4.network }}/16
 leftid={{ ansible_eth0.ipv4.address }}
 right={{ hostvars[host].ansible_eth0.ipv4.address }}
 rightsubnet={{ hostvars[host].ansible_eth1.ipv4.network }}/16
 rightid={{ hostvars[host].ansible_eth0.ipv4.address }}
 dpddelay=30
 dpdtimeout=120
 dpdaction=hold
 keyexchange=ikev1
 auto=start

{% endif %}
{% endfor %}
I won’t go into the actual configuration of strongSwan, only focus on the Ansible parts. The first line is a comment line including the {{ ansible_managed }} variable, which lets users who open the resulting ipsec.conf file know that the file is managed by Ansible. Then we setup connection defaults. The interesting part, after “Connections will be added here”, is the for loop where we loop through all of the hosts in the vpn group (all of our vpn gateway machines). The very next line is an if statement which makes sure that the current Ansible hostname isn’t the the current entry in the for loop. This is basically to make sure that we don’t try to setup a connection to ourselves. I.e. lon-vpn-1 should not have a vpn connection to lon-vpn-1, only to the other hosts.
We then give each connection a name to correspond with the remote host. Within the for loop the {{ hostvars[host].ansible_hostname }} will contain the name of the current remote host.
For the left side of the tunnel, we enter the ip address of eth0 on the current host using the {{ ansible_eth0.ipv4.address }}. For the inside network we use the {{ ansible_eth1.ipv4.network }} variable and statically define that the network will use a /16 mask. The ip address on the right side comes from the {{ hostvars[host].ansible_eth0.ipv4.address }}.
When we run this Playbook each machines ipsec.conf file will contain three connections, one for each other VPN gateway. If we would have had 50 remote locations the file would contain 49 different connections.
ipsec.secrets.j2:
# THIS IS NOT SECURE, AND ONLY TO BE USED FOR DEMONSTRATION PURPOSES
# TO MAKE IT SECURE YOU SHOULD MAKE SURE TO GENERATE UNIQUE KEYS FOR
# EACH TUNNEL OR USE DIGITAL CERTIFICATES

{% for host in groups['vpn'] %}
{% if not ansible_hostname == hostvars[host].ansible_hostname %}
{{ ansible_eth0.ipv4.address }} {{ hostvars[host].ansible_eth0.ipv4.address }} :  PSK "Password1234NotSecure"
{% endif %}
{% endfor %}
The ipsec.secrets.j2 file works the same way as ipsec.conf.j2 and loops through all the hosts and defines a pre shared key for each VPN tunnel. As you can see it uses the same key for all of the tunnels. This is by no means secure and shouldn’t be used. Again the goal here is to demonstrate what you can do with Ansible, not create a complete solution. If you wanted to do anything like this and use it in production you would probably want to use digital certificates and perhaps provision them with Ansible.
The final lines when we use the template modules is the “notify: restart strongswan” entry which triggers a handler. Look in the roles/strongswan/handlers/main.yml file:
---
# Restart service when config files has been changed
- name: restart strongswan
  service: name= state=restarted
Basically each time the ipsec.conf or ipsec.secrets changes we trigger the task “restart strongswan” which uses the service module and restarts the service named as defined by our variable.
Again, you can grab the files for this playbook from GitHub.
This test was actually done with machines located in New York, London, Amsterdam and Singapore. I setup four virtual machines on DigitalOcean, and just chose their smallest servers. If you want to test this Playbook there it’s really enough just to have two servers, or you can just create a few machines in your own environment.
Using the inventory file from the playbook we can start by testing the connectivity to all the hosts.
# ansible -i vpnhosts_inventory -m ping all
ams-vpn-1 | success >> {
    "changed": false,
    "ping": "pong"
}

lon-vpn-1 | success >> {
    "changed": false,
    "ping": "pong"
}

ny-vpn-1 | success >> {
    "changed": false,
    "ping": "pong"
}

sin-vpn-1 | success >> {
    "changed": false,
    "ping": "pong"
}
Now that we have connectivity we can run the playbook.
ansible-playbook -i vpnhosts_inventory strongswan-demo.yml
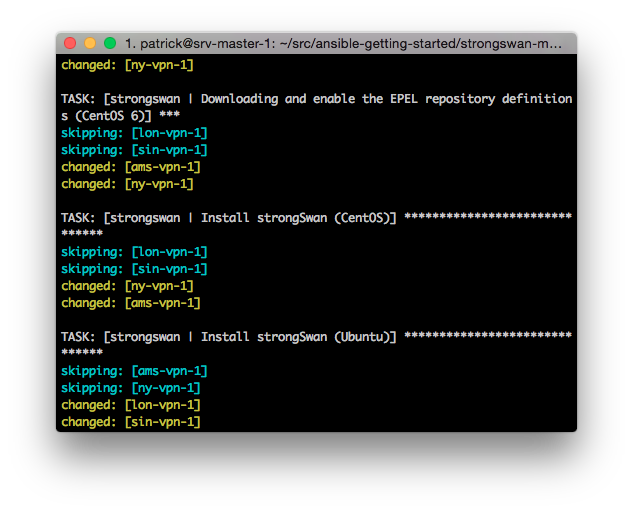
As the playbook runs we can see that some tasks are skipped on the Ubuntu hosts while others are skipped while using CentOS.
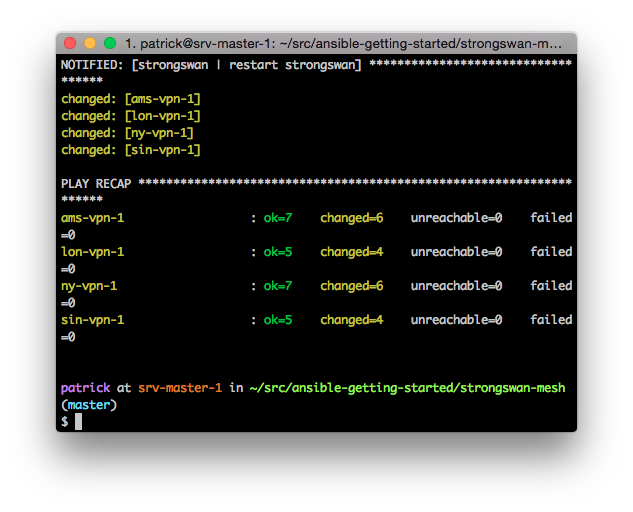
When the playbook comes to an end we can see that all of the tasks completed successfully and everything should be up and running.
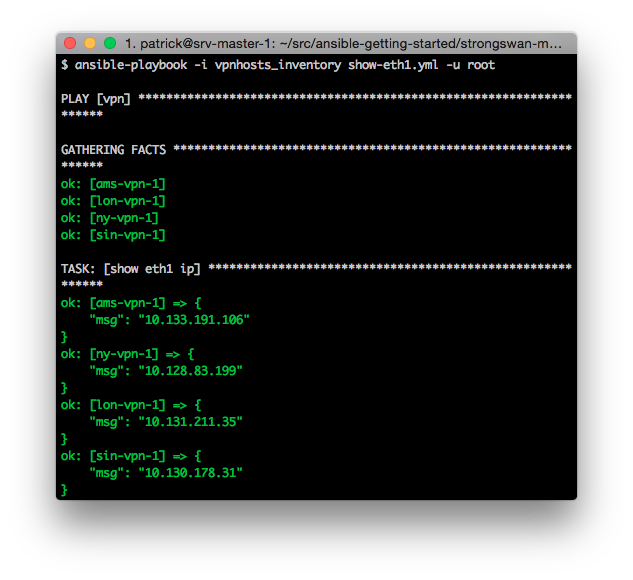
In the GitHub repo there’s also a small playbook which shows the internal addresses of all the hosts.
Finally we can login to the lon-vpn-1 system and issue the “ipsec status” command to see the current tunnels, which shows that we have a tunnel to each of the other sites.

We also ping the internal address of ny-vpn-1 (10.128.83.199)
While I think Ansible is great for setting up my home network and testing things out. I’m mostly interested in using Ansible for network equipment. When I wrote this post Ansible didn’t have any modules to work with network devices. As a test I wrote a few modules which could change configurations on Cisco IOS devices using SNMP, while it was a cool test it wasn’t very practical. However, a lot of network modules were introduced in Ansible 2.1. For example there’s now a specific module to configure Cisco IOS, another possibility is to use Napalm from Ansible.
Get the example playbook from this article on Github.
Though this post is perhaps somewhat long (is anyone still reading? :)), it only really scratches on the surface of what you can do with Ansible. However hopefully you have a pretty good idea about the things that are possible. Even though we just used a few basic modules we could create configuration on several machines which included data from the other machines in the network.
To end this I’d really just want to say; Try Ansible and test it out for a while.